Connecting your Android device to the Android Debug Bridge (ADB) via Wi-Fi can offer convenience and flexibility, eliminating the need for a physical connection. By following a few simple steps, you can establish a wireless connection to ADB and seamlessly debug your Android applications. This article will guide you through the process of connecting ADB over Wi-Fi.

Step 1: Enable Developer Options on your Android device
To begin, you need to enable the Developer Options on your Android device. Go to the “Settings” menu, scroll down to find “About phone” or “About device,” and tap on it. Look for the “Build number” and tap on it seven times until a message appears, confirming that Developer Options have been enabled.
Step 2: Access Developer Options
Once you have enabled Developer Options, go back to the main “Settings” menu. You should now see “Developer Options” listed. Tap on it to access the developer settings.
Step 3: Enable USB Debugging
In the Developer Options menu, locate “USB debugging” and enable it by sliding the toggle to the ON position. This allows your Android device to communicate with your computer via ADB.
Step 4: Connect your Android device to your computer via USB
Connect your Android device to your computer using a USB cable. Ensure that your computer has the necessary ADB drivers installed. Once connected, open a command prompt or terminal window on your computer.
Step 5: Verify ADB connection
In the command prompt or terminal, type the following command:
adb devices
Step 6: Connect ADB over Wi-Fi
In the command prompt or terminal, enter the following command:
adb tcpip 5555

This command restarts the ADB daemon in TCP/IP mode on port 5555.
Step 7: Find the IP address of your Android device
There are two methods to obtain the IP address of your Android device: through the command line or the device’s settings.
Command Line Method:
Command Line Method: On the command line of your computer, type the following command:
adb shell ip addr show wlan0

Locate the IP address displayed after the “inet” keyword until the “/” symbol. Make a note of this IP address.
Settings Method:
Alternatively, you can retrieve the IP address from the device’s settings. Follow these steps on your Android device:
- Open the “Settings” menu.
- Navigate to “About” or “About phone.”
- Select “Status” or a similar option.
- Look for the “IP address” entry and make a note of the displayed IP address.
Once you have obtained the IP address, proceed to the next step to establish a Wi-Fi connection to ADB.
Step 8: Disconnect the USB connection
Once your device is successfully connected and recognized by ADB, you can disconnect the USB cable.
Step 9: Establish Wi-Fi connection to ADB
In the command prompt or terminal, type the following command, replacing “DEVICE_IP_ADDRESS” with the IP address you obtained in the previous step:
adb connect DEVICE_IP_ADDRESS:5555

This command establishes a connection between your computer and your Android device over Wi-Fi.
Step 10: Verify ADB over Wi-Fi connection
To confirm a successful connection, enter the command:
adb devices
Your Android device should now be listed as a connected device.
Troubleshooting
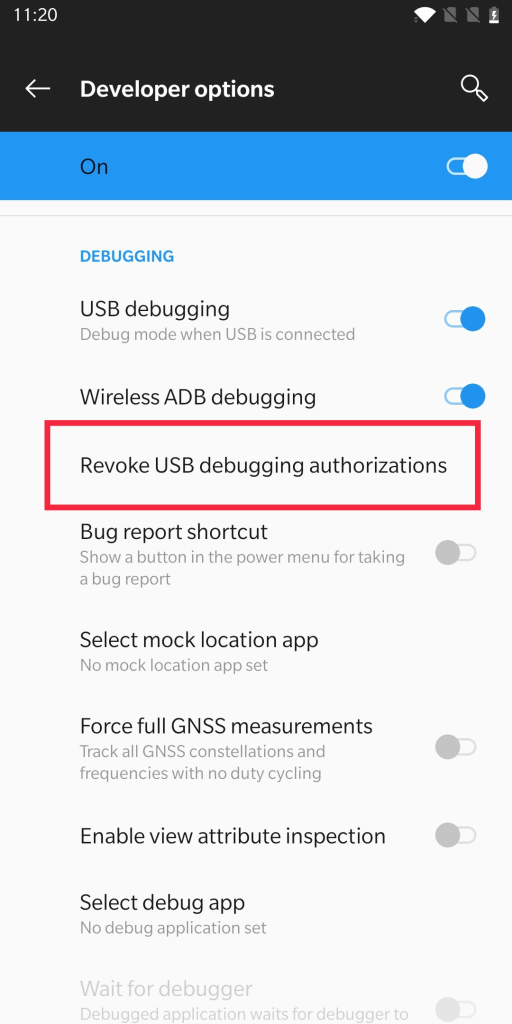
If you get an error “No connection could be made because the target machine actively refused it. (10061)” then revoke USB debugging authorizations, and try the process again from Step 6.
If it still shows the same error then try the other solutions mentioned here – No connection could be made because the target machine actively refused it. (10061)
Conclusion
By following these steps, you can connect ADB over Wi-Fi, freeing yourself from the constraints of a physical USB connection. This wireless connection allows for seamless debugging of your Android applications, making the development process more efficient and flexible. Enjoy the convenience of debugging your Android device without the hassle of cables.
- Ultimate Guide: Build A Mobile E-commerce App With React Native And Medusa.js - February 15, 2025
- Flutter lookup failed in @fields error (solved) - July 14, 2023
- Free open source alternative to Notion along with AI - July 13, 2023