
CI is the short form for Continuous Integration. It is also used along with the term CD which is Continuous delivery. CI, CD, CI/CD. They are all pretty much the same. Let’s dive into CI setup for react
What does CI/CD do?
CI/CD is used to automate deployments of a project. It could be a website, webapp, backend or mobile app. You can use CI/CD for any such deployments.
Does CI/CD really help?
This is a question that beginners might have in their mind. Yes it helps a lot.
- Automates deployments
- Automates testing
- Saves a lot of time
- Reduces human error (For ex: incrementing build numbers)
- Notify everyone especially testing team regarding the new build
Just a few benefits of CI/CD but you will find more!
How to setup CI for React app
Most of the react users use create-react-app to generate their react apps so I’ll explain how to setup CI for create-react-app
create-react-app comes with web pack and optimized production build configuration. Running a single command will generate the build.
The command to generate react build is yarn build if you’re using yarn or npm run build if you’re using npm
We’ll be using Gitlab CI to automate the react app deployment.
What is Gitlab?
Gitlab is just a version control system just like GitHub or bitbucket but Gitlab is free to use even for private repositories. I use GitLab for most of my projects.
Gitlab also comes with a feature called Gitlab CI which can be used to setup deployments or run any tasks whenever you push some code to your repo.
How does Gitlab CI/CD work?
Gitlab CI is very simple to use. All you need to do is to use gitlab for you code base repo and one extra file named .gitlab-ci.yml which contains the configuration and script that need to run whenever you push code to your repo. Read more about gitlab ci here – https://docs.gitlab.com/ee/ci/
Gitlab CI configuration for create-react-app
I’m assuming that you have already set up the react app on your server once in a folder called var/www/my-project so all the contents of the build folder generated from yarn build lies in this folder.
There are only 2 steps required for setting up Gitlab CI for create-react-app
- Create a file called
.gitlab-ci.ymlin the root folder and paste the below configuration in it. - Setup environment variables to SSH into your server as mentioned in the below section.
Have a look the script that I use to automate deployments of my react app. This is the configuration that you should paste in .gitlab-ci.yml
image: node:10

cache:
  paths:
    - node_modules/

before_script:
  - apt-get update -qq && apt-get install -y -qq sshpass rsync

deploy_production:
  only:
    refs:
      - master
  stage: deploy
  environment: Production
  script:
    - yarn install
    - yarn build
    - cd build/
    - ls
    - sshpass -V
    - export SSHPASS=$USER_PASS
    - sshpass -e rsync -r --omit-dir-times -e "ssh -o StrictHostKeyChecking=no" . $USER_NAME@$SERVER_IP:/var/www/my-project
Configuration explanation
The above configuration tells GitLab to run the CI pipeline whenever something is pushed only to the master branch, Install sshpass and rsync before running the script, build the app using `yarn build` command then upload the content of build folder to our project folder in the server
image: node:10
image: node 10 just tells which version of NodeJs to use. You can set it to latest stable NodeJs version or any specific version that you need. Above line tells GitLab to use NodeJs 10 version
before_script:
  - apt-get update -qq && apt-get install -y -qq sshpass rsync
before_script is meant to run or install anything before the CI starts running the script. Currently, We are using before_script to install sshpass and rsync.
We are using sshpass to log in securely to our server. (We are not revealing the server credentials in .gitlab-ci.yml We will be using GitLab’s environment variables to securely store our server credentials. More details mentioned below.
We are using rsync to sync the build folder to our server. Basically, It uploads the build folder to our server
deploy_production:
  only:
    refs:
      - master
  stage: deploy
deploy_production is the name of the stage. You can have multiple stages depending on your use case. For example, You can have build, test stages separately to build the code in one stage and test the code in one stage and finally deploy the code in another stage.
Current example has only 1 stage named deploy_production
stage: deploy
stage: deploy tells GitLab that this is a stage of type deployment. There are 3 stage types in GitLab CI by default. They are test, build, and deploy. These types are required for GitLab CI to maintain the proper order of execution.
script:
    - yarn install
    - yarn build
    - cd build/
    - ls
    - sshpass -V
    - export SSHPASS=$USER_PASS
    - sshpass -e rsync -r --omit-dir-times -e "ssh -o StrictHostKeyChecking=no" . $USER_NAME@$SERVER_IP:/var/www/my-project
Code inside the script: block is the actual CI script. yarn install to install dependencies, yarn build to build the app. cd into build folder, log the version of sshpass
export SSHPASS=$USER_PASS is used to set the password for SSHing to our server. USER_PASS is an environment variable that we should set in gitlab settings. Setting the password in GitLab settings rather than in the script is to ensure security and no one with the access to code would be able to get the server credentials.
How to set environment variables in GitLab
Go to your GitLab repo > Settings > CI/CD
Now go the variables section and enter your server IP and SSH credentials as shown in the image below.
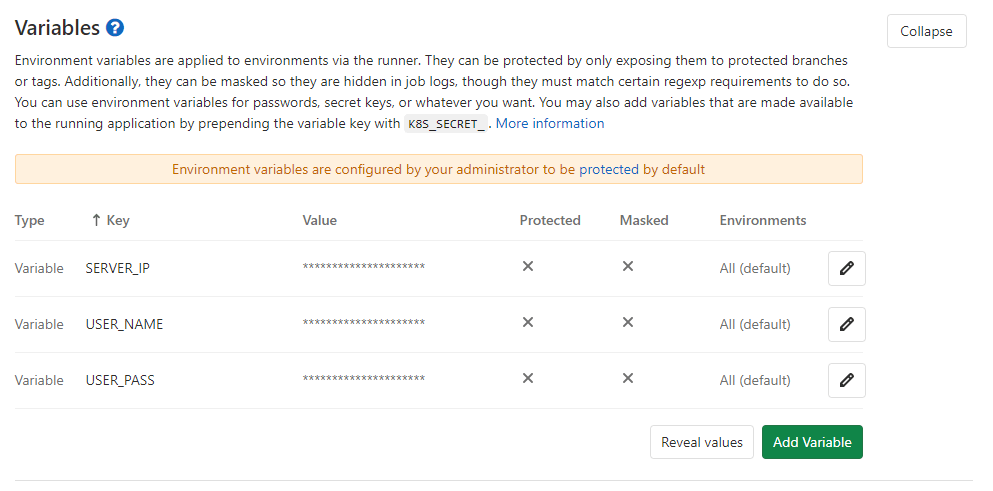
We should setup 3 environment variables. SERVER_IP which is the IP address of your server. USER_NAME which is your server’s user name to SSH into and USER_PASS which is the password used to SSH to your server.
sshpass -e rsync -r --omit-dir-times -e "ssh -o StrictHostKeyChecking=no" . $USER_NAME@$SERVER_IP:/var/www/my-project
This is the line that will SSH into your server and upload the build folder. $SERVER_IP and $USER_NAME are pulled from GitLab’s environment variables which we set up in the above step.
Wrapping up
I just gave a long detailed explanation but it is actually simple 2 steps of copy-pasting the config file and setting the environment variables in GitLab settings. After completing this setup, you don’t have to worry about manually deploying your app every time you make a change. Cheers!
Read more react articles here
If you have any questions or feedback then do let me know in the comment section below.
- Ultimate Guide: Build A Mobile E-commerce App With React Native And Medusa.js - February 15, 2025
- Flutter lookup failed in @fields error (solved) - July 14, 2023
- Free open source alternative to Notion along with AI - July 13, 2023
This will make deploying apps very easy. Thanks a lot for these amazing tips! It will save a lot of time.
Glad it helped 🙂
Great article!!! Thanks
Hi, I am facing the following issue
sshpass: Failed to run command: No such file or directory
while executing this command with gitlab ci suver:
sshpass -e rsync -r –omit-dir-times -e “ssh -o StrictHostKeyChecking=no” . $USER_NAME@$SERVER_IP:/root/some_folder
Can you advice me how to proceed?
Hi Milen, Do you have some_folder in your root?